
This article will help you understand how to optimize your product data using the WakeupData Transformation Engine.
The Transformation Engine is a tool that will make it super easy for you to perform on demand bulk adjustments to your product feed data. The Transformation Engine is accessible through field conversions and mappings of attributes in specific channels. Field Conversions are used to create “master rules” that can affect data for multiple channels while channel specific mappings are used on each individual channel.
In this tutorial we are using Google Shopping as our channel, beware that data requirements might vary depending on your chosen channel.
The Transformation Engine has many possibilities, and we will be covering the most important ones in this article.
How to optimize product data, using the transformation engine
Quick links:
PRO: Taking your data transformations to the next level
Using transformations in channel mappings
In your Channel Overview, click ‘Mappings’, which will lead you to the place where you can manage your channel mappings.
Step 1 - How enable Transformation Engine
There are several ways of mapping your channel data, we recommend using the transformation engine option.
The first step is to match the right field in your source feed with the corresponding field for your channel feed. In this way you can ensure that the right information will appear on your chosen channel.
In this example we will show you how to optimize your product title, so click ‘Product title’ (1), then ‘Transformation Engine’ (2) as your data method and then ‘Go to transformation engine’ (3).

Step 2 - How to Insert Data
Now the fun begins, mapping data and if necessary, making modifications. There will be two options in front of you now ‘Insert text’ or ‘Insert field’.

Step 2 a - How to use transformation engine for products that need a generic value by Inserting text
In case you want the same piece of text to appear for all (or many) products, you can manually insert text by clicking on ‘Insert text’. This could, for example, make sense if you do not have certain information in your import feed, like a missing brand that is the same for all products. It can also be used to add an empty space between used data segments.
 Step 2 b - Inserting a field
The ‘Insert field’ option is used to map a field from your import feed to your export channel. Click ‘Insert field’ and select the relevant data field in the drop-down menu.

At this point, it is possible to add multiple fields to a specific mapping. For example, adding size, color, and brand to your product title.
NOTE: From this point onward the ‘Save’ button will be your best friend. If you leave the Transformation Engine without saving modifications, they will NOT appear in your export.
Step 3 – How to make modifications
In some cases, you might want to make changes to the content of certain fields. This can be done by clicking on ‘Modify’ (1).

Once you have decided to modify the selected field you will get a preview of its output content below (3). Now it is time to make the necessary modifications under ‘Make modifications to field content’ (2), which indeed speaks for itself. The idea here is that you identify which specific changes need to be made to this specific part of your data. For starters, these modifications can be divided in 5 different categories:
- Modify text (Step 3a)
- Remove spaces (Step 3b)
- Casing (Step 3c)
- Html & Url (Step 3d)
- Math (Step 3e)
Step 3a – How to modify text
The ‘Modify text’ tool will allow you to make specific textual changes, which can be a great asset when text needs cleaning up and organizing. The optional changes come in the form of adding, replacing, and removing text.

After clicking ‘Modify text’ you can choose the required operation from the drop-down. You will find the following categories with several options to transform your data:
- Append/Prepend Text → Add text before or after the existing text
‘Append Text’ Example: Adding a ‘.’ at the end of every product description.
‘Prepend Text’ Example: Adding the brand name to the beginning of every product title
‘Add Default if Empty’ Example: Adding a default Google Product Category to any product that does not have one assigned.
- Replace Text → Replacing certain pieces of text with different text
In certain cases, it might be that parts of the data can be expressed in a better way. With this tool you can for example replace ‘and’ and ‘or’ with ‘/’. Which could make a product title or description look cleaner and more organized.
‘Replace text’ Example: Complicated category names may be replaced by shorter, and easier to read versions.
‘Replace text’ Example: Maybe colors from one supplier have long and complicated names, it might be more efficient to replace them with standard color names.
‘Replace text’ Example: Branching into new markets, you can use the replace text feature to translate words in your product titles.
- Remove Text → Removing unwanted pieces of text
This can come in handy when there are certain words or punctuation that you do not want to appear in the export.
‘Remove text’ Example: Remove unnecessary words from product titles and/or descriptions.
‘Remove text’ Example: Remove until a certain piece of text or remove from a certain piece of text to make product titles and descriptions more relevant to potential users.
- Formatting Text → Changes formatting of number and turns the value into a text string
This can be useful if you want to add your price to your product images for advertising on ie. Facebook.
‘Formatting text’ Example: Convert 1295.933 to 1,295.93
Every time you click one of the modification buttons a new row will appear allowing you to apply multiple modifications per field in your product feed.

Step 3b – How to remove spaces
You can use the ‘Remove spaces’ tool if the data in the selected field needs trimming in terms of spaces. By using the dropdown menu, you can go for the following actions:
- Remove spaces on both sides
- Remove spaces to the left
- Remove space to the right
- Remove all spaces
- Change multiple spaces to one space
Step 3c – How to use casing
The ‘Casing’ tool will allow you to manage the casing of the text. In some cases the export feed might make changes to the casing of your product information, all words might appear in capital letters for example.
This part of the Transformation Engine gives you the option to:
- Convert to lowercase
- Convert to uppercase
- Capitalize first word (of the text in the field)
- Capitalize first letter of every word
'Casing' Example: Nike blue running shoe size 39 → Nike Blue Running Shoe Size 39
- Swap casing
Casing' Example: nIKE bLUE rUNNING sHOE sIZE 39 → Nike Blue Running Shoe Size 39
Step 3d – How to use Html & Url
The ‘Html & Url’ tool will allow you to clean up any unnecessary pieces of html code or encode and decode both url and html that has ended up in the data fields. Here, you will get the following actions in the dropdown:
- Clean html intelligently
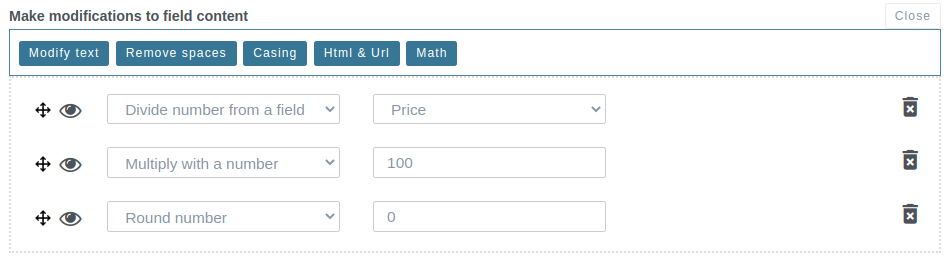
Step 3e – How to use the Math features
The ‘Math’ tool will come in handy for the fields in which you use numbers (numeric fields), like those that contain prices.
‘Math’ Example: Use 'Multiply with a number' to add VAT to product prices without VAT
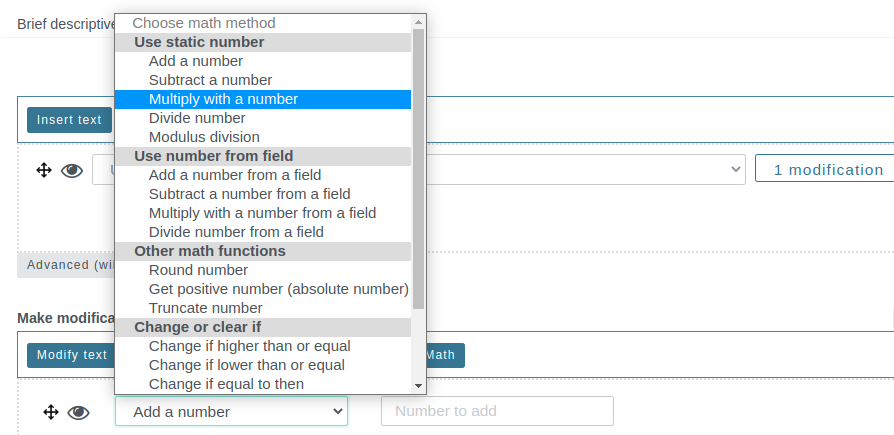
Math’ Example: Use 'Divide number from a field', 'Multiply with a number' and 'Round number' to calculate ie. profit margin on your products.
NOTE: Keep in mind that the order of your actions is important.
NOTE: At any moment you can remove modification you have made by clicking on the icon on the right-hand side of each individual modification.
Taking your data transformations to the next level
If you are doing some clever transformations that you would like to use on multiple export channels or you are planning to use WakeupData Actions, you should set them up as field conversions, then you can be more efficient.
See What are Field Conversions? and How to copy/sync Field Conversions? to take your feed management to the next level.